Your form has been submitted. We'll contact you in 24 hours.
Close
Home/Blog/Implementing Access Control Lists (ACLs) with Nginx Proxy Manager
Implementing Access Control Lists (ACLs) with Nginx Proxy Manager
PYPROXY·Jun 17, 2025
In today’s fast-paced digital world, security has become a top priority for businesses of all sizes. Nginx Proxy Manager is a powerful tool that simplifies the management of proxy servers, making it easier to handle reverse proxy settings, SSL certificates, and more. One of the key features that can enhance the security and performance of your network infrastructure is the implementation of Access Control Lists (ACL). ACLs are used to control and restrict access to your network, allowing only authorized users or devices to communicate with your server. This guide will provide a step-by-step process for setting up ACLs with Nginx Proxy Manager, explaining their importance, functionality, and how they can be used to improve your overall network security.
What is an Access Control List (ACL)?
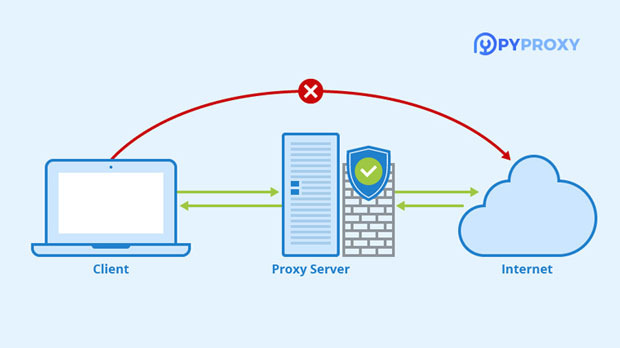
An Access Control List (ACL) is a set of rules used to define who or what can access resources within a network. ACLs specify the allowed or denied access to different parts of the network based on IP addresses, user credentials, or other factors. By using ACLs, you can control the flow of traffic between your internal network and the internet, restricting unauthorized access and protecting sensitive information.
In the context of Nginx Proxy Manager, ACLs act as a gatekeeper for your proxy server, determining which requests are allowed to pass through and which ones should be blocked. This is crucial for enhancing security by preventing unwanted or malicious traffic from reaching your server.
Why Use Nginx Proxy Manager for ACL Implementation?
Nginx Proxy Manager provides an intuitive interface for managing Nginx proxy configurations, which includes the ability to set up ACLs. Without a user-friendly interface, configuring ACLs directly on the Nginx server could be a complex and error-prone process. However, with Nginx Proxy Manager, administrators can easily create, modify, and manage access control rules from a simple dashboard.
Some key reasons for using Nginx Proxy Manager to implement ACLs include:
1. Ease of Use: The user-friendly interface simplifies the configuration of ACLs, making it accessible to even those with limited technical expertise.
2. Granular Control: Nginx Proxy Manager allows you to create detailed and specific access rules based on various parameters like IP addresses, HTTP methods, and user proxies.
3. Centralized Management: You can manage multiple proxy servers from a single dashboard, streamlining the administration of access control policies across your infrastructure.
How to Set Up ACLs in Nginx Proxy Manager?
Setting up ACLs in Nginx Proxy Manager is a straightforward process, thanks to its intuitive user interface. Below is a step-by-step guide to implementing ACLs:
1. Log in to Nginx Proxy Manager
First, you need to log in to the Nginx Proxy Manager dashboard. Once logged in, you will have access to all the proxy server settings, including the ability to configure ACLs.
2. Navigate to the "Access Lists" Section
From the dashboard, navigate to the "Access Lists" section in the Nginx Proxy Manager menu. Here, you can see all the current ACL rules and create new ones. This is where you will define the rules that control who can and cannot access your server.
3. Create a New Access Control List
Click on the “Add Access List” button to create a new ACL. You will be prompted to enter a name for the ACL and define its rules. You can specify whether to allow or deny access based on various criteria, such as:
- IP Address: You can allow or deny access to specific IP addresses or ranges.
- Subnet: You can create rules based on subnets, allowing entire blocks of IP addresses access or denying them.
- User Agent: You can filter requests based on the user agent string, which is useful for blocking specific browsers or bots.
- HTTP Method: You can restrict access based on the type of HTTP request (GET, POST, etc.).
4. Assign the ACL to a Proxy Host
After creating the ACL, the next step is to assign it to a specific proxy host. A proxy host is a service or server that is being accessed through Nginx Proxy Manager. To do this, navigate to the “Proxy Hosts” section, select the proxy host, and apply the ACL you just created. This will enforce the access control rules for all incoming requests to that proxy host.
5. Test the Configuration
Once the ACL is applied, it is important to test the configuration to ensure that the rules are being enforced correctly. You can do this by attempting to access the server from an allowed IP address and a denied IP address. Ensure that the ACL is blocking or allowing traffic as specified in your rules.
Best Practices for ACL Configuration
While configuring ACLs, there are several best practices you should follow to ensure optimal security and performance:
1. Implement Least Privilege
When setting up ACLs, always follow the principle of least privilege. This means granting the minimum level of access required for users or devices to perform their tasks. By restricting access to only those who need it, you reduce the risk of unauthorized access and potential breaches.
2. Regularly Review and Update ACL Rules
It is essential to regularly review and update your ACL rules to reflect changes in your network environment. For example, if you add new users or devices to your network, you should update the ACL to allow or deny access as necessary. Similarly, if a user’s role changes, you should modify their access permissions accordingly.
3. Monitor and Log Access
To maintain the security of your network, it is important to monitor and log all access attempts. Nginx Proxy Manager offers logging features that allow you to track who accessed your server, when, and from where. This can help identify potential security threats and provide valuable insights into traffic patterns.
4. Combine ACLs with Other Security Measures
ACLs are just one part of a comprehensive security strategy. To further protect your network, consider combining ACLs with other security measures such as SSL encryption, two-factor authentication, and intrusion detection systems. By layering security tools, you can create a more robust defense against potential threats.
In conclusion, Nginx Proxy Manager provides an efficient and easy-to-use platform for implementing Access Control Lists (ACLs) to secure your network infrastructure. By setting up ACLs, you can restrict unauthorized access, improve network security, and protect sensitive information. With its simple interface and powerful features, Nginx Proxy Manager makes it easy for administrators to manage and enforce access control rules. Following best practices such as implementing least privilege and regularly reviewing your ACL rules will ensure that your network remains secure and well-maintained.