Your form has been submitted. We'll contact you in 24 hours.
Close
Home/Blog/How to set up an IP address proxy on MacOS?
How to set up an IP address proxy on MacOS?
PYPROXY·Jan 28, 2025
When it comes to browsing the internet with enhanced privacy or accessing region-locked content, using a proxy server can be an excellent solution. A proxy server works by masking your IP address and routing your traffic through a different server, effectively changing your perceived location. In this guide, we’ll explore how to set up an ip address proxy on macOS. Whether you're looking to maintain privacy, bypass geographical restrictions, or secure your online activities, configuring a proxy on your Mac can significantly enhance your browsing experience. Let’s break down the process into clear and manageable steps.
Understanding the Basics of IP Address Proxy
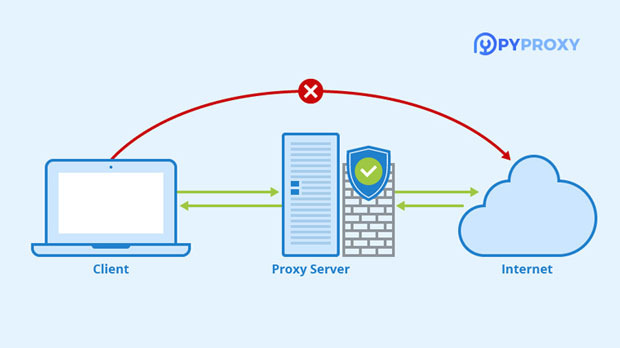
Before diving into the configuration steps, it's important to understand what an IP address proxy is and how it works. A proxy server acts as an intermediary between your computer and the internet. When you access a website or online service, your computer sends a request to the proxy server, which forwards the request to the target server. The response is then sent back through the proxy server and to your device.
By using a proxy server, your actual IP address is hidden from the destination server, replaced with the IP address of the proxy server. This enhances your privacy and can also make it appear as if you are browsing from a different location. There are different types of proxies, such as HTTP, HTTPS, SOCKS, and others, each offering different levels of security and functionality.
Why Use a Proxy on MacOS?
There are several reasons why someone might want to use a proxy on macOS. Here are a few key motivations:
1. Privacy and Security: A proxy server can provide an additional layer of security by hiding your actual IP address, making it harder for third parties to track your online activities.
2. Bypass Geographical Restrictions: Many online services restrict content based on your geographical location. By using a proxy, you can make it appear as though you are browsing from a different location, giving you access to region-restricted content.
3. Improved Browsing Speed: In some cases, proxies can cache content, which can lead to faster loading times for frequently accessed websites.
4. Bypass Network Restrictions: If you’re using a network that restricts certain websites, such as a school or office network, a proxy can help bypass these restrictions and grant you unrestricted internet access.
Steps to Set Up an IP Address Proxy on MacOS
Now that you have a basic understanding of proxies and why they might be useful, let’s move on to setting up a proxy on your Mac. The process is relatively straightforward and can be done through macOS’s built-in network settings.
Step 1: Open Network Preferences
1. Access System Preferences: Click on the Apple icon in the top-left corner of your screen and select System Preferences.
2. Select Network: In the System Preferences window, click on the Network option.
This will open the Network settings, where you can configure different network connections, including Wi-Fi, Ethernet, and VPN.
Step 2: Choose Your Network Interface
1. In the left-hand column, select the network interface you are using (for example, Wi-Fi or Ethernet). The selected connection should be highlighted in blue.
2. After selecting your network interface, click on the Advanced button in the lower-right corner of the window.
Step 3: Access Proxy Settings
1. Once the Advanced settings window opens, navigate to the Proxies tab.
2. Here, you will see a list of different proxy settings that you can configure, including Web Proxy (HTTP), Secure Web Proxy (HTTPS), and more. Depending on the type of proxy you want to set up, you will check the corresponding box.
Step 4: Enter Proxy Server Details
1. Web Proxy (HTTP) and Secure Web Proxy (HTTPS): If you're using a standard HTTP or HTTPS proxy, check the box for Web Proxy (HTTP) or Secure Web Proxy (HTTPS).
2. Enter Proxy Server Address: In the field labeled Proxy Server, enter the IP address or hostname of the proxy server you are using.
3. Enter Port Number: Below the Proxy Server field, there will be a box for the Port number. This should be provided by the proxy service you are using (or your network administrator).
4. Authentication: If the proxy requires authentication, you will need to enter your username and password in the corresponding fields.
Step 5: Apply Proxy Settings
1. After entering the proxy server’s details, click OK to save your settings.
2. In the main Network settings window, click Apply to activate the proxy settings.
Your Mac will now route internet traffic through the proxy server. If everything is configured correctly, your internet traffic will be masked with the IP address of the proxy server.
Step 6: Test Your Proxy Connection
To ensure that your proxy is working correctly, you can test it by visiting a website that shows your IP address. If the proxy is set up correctly, the IP address displayed should match that of the proxy server and not your actual IP address.
Advanced Configuration Options
In addition to basic proxy configuration, macOS offers advanced settings for more control over how proxies function. Here are some options to consider:
1. Automatic Proxy Configuration: Some proxies require an automatic configuration script. If this is the case, you can check the Auto Proxy Discovery or Automatic Proxy Configuration options and enter the URL of the proxy configuration script.
2. Proxy for Specific Websites: You can configure macOS to use the proxy only for specific websites. This is useful if you want to route traffic to certain sites through the proxy while bypassing it for others. To do this, simply add the URLs to the Bypass proxy settings for these Hosts & Domains field.
3. SOCKS Proxy: SOCKS proxies offer more flexibility and can handle various types of traffic, including FTP, IRC, and more. If you need to configure a SOCKS proxy, check the SOCKS Proxy option and provide the server details.
Common Issues and Troubleshooting
While setting up a proxy on macOS is relatively simple, you may encounter a few issues along the way. Here are some common problems and how to resolve them:
1. Proxy Not Working: Ensure that you have entered the correct proxy server address and port number. Double-check any authentication credentials if required.
2. Slow Internet Speed: If your internet speed seems slower after setting up the proxy, try switching to a different proxy server or using a different type of proxy.
3. Cannot Access Certain Websites: Some websites may block proxy traffic. If you are unable to access a site, try using a different proxy server or check the proxy’s settings.
Conclusion
Setting up an IP address proxy on macOS is a simple process that can provide increased privacy, better security, and access to region-restricted content. By following the steps outlined above, you can easily configure a proxy on your Mac. Remember to test your connection and ensure the proxy is functioning as expected. Whether you're using a proxy for privacy, security, or to bypass restrictions, the ability to control your online traffic gives you greater freedom and flexibility on the internet.