Your form has been submitted. We'll contact you in 24 hours.
Close
Home/Blog/How do I configure dedicated proxies in my browser?
How do I configure dedicated proxies in my browser?
PYPROXY·May 22, 2025
In the digital age, privacy, security, and anonymity are becoming increasingly important for internet users. One effective way to enhance these aspects is by using proxies, specifically dedicated proxies. These are proxies assigned solely to one user, offering higher speed, reliability, and security compared to shared proxies. Configuring dedicated proxies in your browser can help you manage web traffic and improve your browsing experience. In this article, we will explore how to configure dedicated proxies in a browser, ensuring you can enjoy a seamless, secure, and private browsing experience.
Understanding Dedicated Proxies
Before diving into the configuration process, it's crucial to understand what dedicated proxies are and how they differ from other types of proxies.
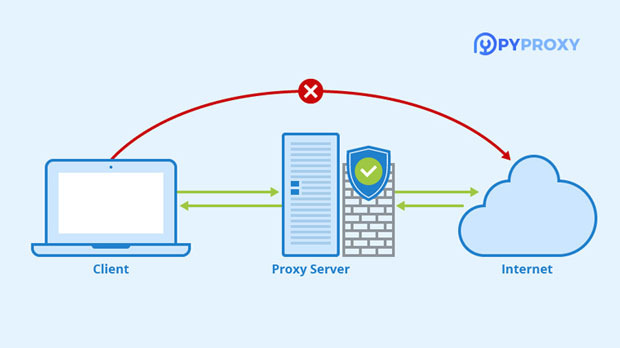
A dedicated proxy is a private proxy assigned to a single user, meaning only that user can access and utilize it. Unlike shared proxies, which are used by multiple users at once, dedicated proxies offer more reliability, faster speeds, and better security. They are commonly used by individuals or businesses that need enhanced privacy, access to restricted content, or the ability to manage multiple accounts securely.
With dedicated proxies, all of your internet traffic is routed through a specific server, masking your real IP address. This allows you to browse the internet anonymously, without revealing your true location or identity. Dedicated proxies are particularly beneficial for tasks like web scraping, online gaming, social media management, and accessing region-restricted websites.
Why Use Dedicated Proxies in Browsers?
There are several reasons why you might want to use dedicated proxies in your browser. The following are some key benefits:
1. Enhanced Security and Privacy
Dedicated proxies mask your IP address, protecting your online identity. This reduces the risk of being tracked by websites, advertisers, or hackers.
2. Faster and More Reliable Connections
Since dedicated proxies are not shared among multiple users, you won’t experience slowdowns or congestion caused by other people using the same proxy server.
3. Access to Geo-Restricted Content
Dedicated proxies allow you to appear as if you're browsing from a different location, giving you access to region-specific content or services that might otherwise be unavailable in your country.
4. Bypass IP-Based Restrictions
If you're facing restrictions based on your IP address (e.g., account bans or IP blocks), using a dedicated proxy can help you bypass these limitations and continue your activities online without interruption.
Steps to Configure Dedicated Proxies in Your Browser
Now that we understand the benefits of dedicated proxies, let's walk through the steps to configure them in your browser.
1. Acquire a Dedicated Proxy
The first step is to obtain a dedicated proxy. Dedicated proxies are typically available through proxy service providers. You’ll need to select a provider, choose the appropriate plan (usually based on the number of proxies or location preferences), and sign up for their service. After purchasing the proxy, you should receive the proxy’s IP address, port number, username, and password. These details are essential for configuring your browser.
2. Configure Proxy Settings in Google Chrome
Here’s how you can configure a dedicated proxy in Google Chrome:
- Open Chrome Settings: Click the three-dot menu in the upper-right corner of the browser and select "Settings."
- Navigate to Proxy Settings: Scroll down and click on "Advanced," then find the "System" section and click "Open your computer's proxy settings."
- Configure Proxy: This will open the system settings. For Windows, you’ll go to the "LAN settings" under "Internet Properties." For macOS, you’ll find the settings in "Network Preferences."
- Enter Proxy Details: Input the IP address and port number of your dedicated proxy. If your provider requires authentication, enter the username and password as well.
- Save and Exit: Once the settings are saved, your browser will route all internet traffic through the dedicated proxy.
3. Configure Proxy Settings in Mozilla Firefox
For Mozilla Firefox, follow these steps:
- Open Firefox Settings: Click the hamburger menu (three horizontal lines) in the upper-right corner and select "Settings."
- Go to Network Settings: Scroll down and click on "Network Settings" under the "General" tab.
- Manual Proxy Configuration: Select "Manual proxy configuration" and enter the IP address and port number of your dedicated proxy.
- Authentication (if required): If your proxy requires a username and password, enter these details under "Proxy Authentication."
- Save Settings: Click "OK" to apply the changes and close the settings window.
4. Configure Proxy Settings in Microsoft Edge
To configure a dedicated proxy in Microsoft Edge, follow these steps:
- Open Edge Settings: Click on the three-dot menu in the upper-right corner and select "Settings."
- Go to System Settings: Scroll down to the "System" section and click "Open your computer's proxy settings."
- Configure Proxy: This will open the system proxy settings, where you can enter the IP address and port number of the dedicated proxy.
- Save the Settings: After entering the proxy details, save the settings and exit.
5. Testing the Proxy Configuration
After configuring the dedicated proxy in your browser, it’s essential to test whether the setup is working correctly. You can do this by visiting a website like an IP checker, which will display the IP address you are currently using. If the proxy configuration is successful, the IP address shown should match the IP address of your dedicated proxy.
If the configuration isn’t working correctly, double-check the proxy details you entered and ensure there are no typos. Additionally, verify that the proxy server is operational and there are no issues with your internet connection.
Configuring a dedicated proxy in your browser can significantly enhance your online privacy, security, and browsing experience. By following the steps outlined above, you can set up a dedicated proxy on popular browsers like Google Chrome, Mozilla Firefox, and Microsoft Edge. Whether you're looking to bypass geo-restrictions, improve your security, or maintain anonymity while browsing, dedicated proxies offer a reliable and effective solution.